# Multicopter PID Tuning Guide (Manual/Advanced)
PX4 컨트롤러의 튜닝 방법에 대한 자세한 정보를 제공합니다.
:::tip
[Autotune](../config/autotune_mc.md) is recommended for tuning the vehicles _around the hover thrust point_, as the approach described is intuitive, easy, and fast.
이것은 대부분의 기체에 필요합니다.
:::
호버 추력 지점 주변의 튜닝이 충분하지 않을 때 이 가이드를 사용하십시오 (예 : 더 높은 추력에서 비선형성 및 진동이 방생하는 기체).
It is also useful for a deeper understanding of how the basic tuning works, and to understand how to use the [airmode](#airmode-mixer-saturation) setting.
## 튜닝 단계
:::info
For safety reasons, the default gains are set to low values.
적절한 제어 응답을 얻기 위해서는 게인 값을 적절하게 증가시켜야 합니다.
:::
튜닝시 준수할 일반적인 사항은 아래와 같습니다.
- 큰 이득은 위험한 진동을 발생시킬 수 있으므로, 모든 이득은 매우 천천히 증가시켜야합니다!
일반적으로 반복당 이득을 20~30%씩 증가시키고, 최종 미세 조정을 위해 5~10%로 줄입니다.
- 매개변수를 변경하기 전에 착륙시키십시오.
스로틀을 천천히 증가시키고 진동을 점검하십시오.
- Tune the vehicle around the hovering thrust point, and use the [thrust curve parameter](#thrust-curve) to account for thrust non-linearities or high-thrust oscillations.
- Optionally enable the high-rate logging profile with the [SDLOG_PROFILE](../advanced_config/parameter_reference.md#SDLOG_PROFILE) parameter so you can use the log to evaluate the rate and attitude tracking performance (the option can be disabled afterwards).
:::warning
Always disable [MC_AIRMODE](../advanced_config/parameter_reference.md#MC_AIRMODE) when tuning a vehicle.
:::
### 속도 컨트롤러
The rate controller is the inner-most loop with three independent PID controllers to control the body rates (roll, pitch, yaw).
:::info
A well-tuned rate controller is very important as it affects _all_ flight modes.
A badly tuned rate controller will be visible in [Position mode](../flight_modes_mc/position.md), for example, as "twitches" or oscillations (the vehicle will not hold perfectly still in the air).
:::
#### 속도 컨트롤러 아키텍처/양식
PX4 supports two (mathematically equivalent) forms of the PID rate controller in a single "mixed" implementation: [Parallel](#parallel-form) and [Standard](#standard-form).
Users can select the form that is used by setting the proportional gain for the other form to "1" (i.e. in the diagram below set **K** to 1 for the parallel form, or **P** to 1 for the standard form - this will replace either the K or P blocks with a line).
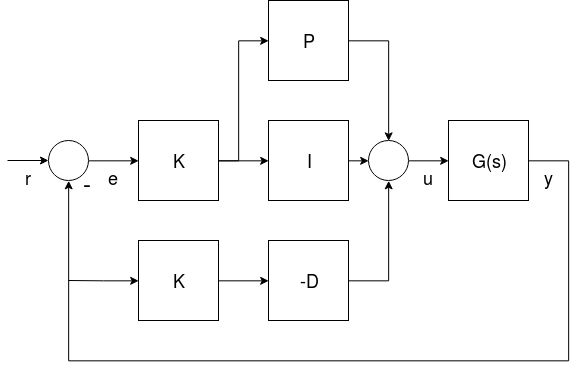
- _G(s)_ represents the angular rates dynamics of a vehicle
- _r_ is the rate setpoint
- _y_ is the body angular rate (measured by a gyro)
- _e_ is the error between the rate setpoint and the measured rate
- _u_ is the output of the PID controller
두 가지 형식이 아래에 기술되어 있습니다.
:::info
The derivative term (**D**) is on the feedback path in order to avoid an effect known as the [derivative kick](http://brettbeauregard.com/blog/2011/04/improving-the-beginners-pid-derivative-kick/).
:::
:::tip
더 자세한 정보는 다음을 참고하십시오.
- [Not all PID controllers are the same](https://www.controleng.com/not-all-pid-controllers-are-the-same/) (www.controleng.com)
- [PID controller > Standard versus parallel (ideal) PID form](https://en.wikipedia.org/wiki/PID_controller#Standard_versus_parallel_\(ideal\)_form) (Wikipedia)
:::
##### 병렬 형식
The _parallel form_ is the simplest form, and is (hence) commonly used in textbooks.
이 경우 컨트롤러의 출력은 간단한 비례, 적분 및 미분 동작의 합입니다.

##### 표준 형식
이 형식은 병렬 형식과 수학적으로 동일하지만 주요 이점은 (반 직관적으로 보일지라도) 비례 이득 튜닝을 적분과 미분 이득에서 분리하는 것입니다.
즉, 비슷한 크기와 관성을 가진 드론의 이득을 취하고 K 이득을 조정하여 적절하게 비행하는 방법으로 새로운 플랫폼을 쉽게 조정할 수 있습니다.

#### 속도 PID 튜닝
PID 속도 컨트롤러 튜닝 매개 변수는 다음과 같습니다.
- Roll rate control ([MC_ROLLRATE_P](../advanced_config/parameter_reference.md#MC_ROLLRATE_P), [MC_ROLLRATE_I](../advanced_config/parameter_reference.md#MC_ROLLRATE_I), [MC_ROLLRATE_D](../advanced_config/parameter_reference.md#MC_ROLLRATE_D), [MC_ROLLRATE_K](../advanced_config/parameter_reference.md#MC_ROLLRATE_K))
- Pitch rate control ([MC_PITCHRATE_P](../advanced_config/parameter_reference.md#MC_PITCHRATE_P), [MC_PITCHRATE_I](../advanced_config/parameter_reference.md#MC_PITCHRATE_I), [MC_PITCHRATE_D](../advanced_config/parameter_reference.md#MC_PITCHRATE_D), [MC_PITCHRATE_K](../advanced_config/parameter_reference.md#MC_PITCHRATE_K))
- Yaw rate control ([MC_YAWRATE_P](../advanced_config/parameter_reference.md#MC_YAWRATE_P), [MC_YAWRATE_I](../advanced_config/parameter_reference.md#MC_YAWRATE_I), [MC_YAWRATE_D](../advanced_config/parameter_reference.md#MC_YAWRATE_D), [MC_YAWRATE_K](../advanced_config/parameter_reference.md#MC_YAWRATE_K))
The rate controller can be tuned in [Acro mode](../flight_modes_mc/acro.md) or [Stabilized mode](../flight_modes_mc/manual_stabilized.md):
- _Acro mode_ is preferred because it allows for isolated rate control testing.
However it is significantly harder to pilot.
::: warning
If you choose this mode, you must [disable all stick expo and have reasonable maximum rates for all axes](../flight_modes_mc/acro.md#stick-input-mapping):
- `MC_ACRO_EXPO` = 0, `MC_ACRO_EXPO_Y` = 0, `MC_ACRO_SUPEXPO` = 0,
`MC_ACRO_SUPEXPOY` = 0
- `MC_ACRO_P_MAX` = 200, `MC_ACRO_R_MAX` = 200
- `MC_ACRO_Y_MAX` = 100
For PX4 v1.15 and later the defaults are set for this purpose to a maximum rate of 100°/s linear mapping for all axes.
:::
- _Stabilized mode_ is simpler to fly, but it is also much more difficult to distinguish if attitude or rate controller causes a certain behavior.
기체 비행이 되지 않는 경우:
- If there are strong oscillations when first trying to takeoff (to the point where it does not fly), decrease all **P** and **D** gains until it takes off.
- If the reaction to RC movement is minimal, increase the **P** gains.
The actual tuning is roughly the same in _Manual mode_ or _Acro mode_:
You iteratively tune the **P** and **D** gains for roll and pitch, and then the **I** gain.
처음에는 롤과 피치에 동일한 값을 사용할 수 있으며, 좋은 값을 얻은 후에는 롤과 피치 응답을 개별적으로 확인하여 미세 조정할 수 있습니다 (기체가 대칭인 경우 필요하지 않음).
For yaw it is very similar, except that **D** can be left at 0.
##### 비례 이득 (P/K)
The proportional gain is used to minimize the tracking error (below we use **P** to refer to both **P** or **K**).
빠른 응답을 담당하므로 가능한 높게 설정하여야 하지만, 진동이 발생하지 않아야 합니다.
- If the **P** gain is too high: you will see high-frequency oscillations.
- If the **P** gain is too low:
- 기체가 입력 변화에 느리게 반응합니다.
- In _Acro mode_ the vehicle will drift, and you will constantly need to correct to keep it level.
##### 미분 이득 (D)
The **D** (derivative) gain is used for rate damping.
오버 슈트를 제거하기 위하여 적절하게 높은 값으로 설정합니다.
- If the **D** gain is too high: the motors become twitchy (and maybe hot), because the **D** term amplifies noise.
- If the **D** gain is too low: you see overshoots after a step-input.
일반적인 값은 다음과 같습니다.
- standard form (**P** = 1): between 0.01 (4" racer) and 0.04 (500 size), for any value of **K**
- parallel form (**K** = 1): between 0.0004 and 0.005, depending on the value of **P**
##### 적분 이득 (I)
The **I** (integral) gain keeps a memory of the error. The **I** term increases when the desired rate is not reached over some time.
It is important (especially when flying _Acro mode_), but it should not be set too high.
- I 게인이 너무 높으면 느린 진동이 나타납니다.
- If the I gain is too low: this is best tested in _Acro mode_, by tilting the vehicle to one side about 45 degrees, and keeping it like that.
같은 각도를 유지하여야 합니다.
If it drifts back, increase the **I** gain.
A low **I** gain is also visible in a log, when there is an offset between the desired and the actual rate over a longer time.
일반적인 값은 다음과 같습니다.
- standard form (**P** = 1): between 0.5 (VTOL plane), 1 (500 size) and 8 (4" racer), for any value of **K**
- parallel form (**K** = 1): between 0.3 and 0.5 if **P** is around 0.15
The pitch gain usually needs to be a bit higher than the roll gain.
#### 테스트 절차
To test the current gains, provide a fast **step-input** when hovering and observe how the vehicle reacts.
명령을 즉시 반등하여야 하며, 진동이나 오버슛이 발생하지 않아야 합니다 ( '고정'된 느낌).
예를 들어 롤용 스텝 입력을 만들 수 있습니다. 롤 스틱을 한쪽으로 빠르게 밀었다가 다시 빠르게 놓아줍니다 (스프링이므로 스틱을 놓으면 스틱도 진동합니다. 잘 튜닝된 기체는 이러한 진동에 반응합니다).
:::info
A well-tuned vehicle in _Acro mode_ will not tilt randomly towards one side, but keeps the attitude for tens of seconds even without any corrections.
:::
#### 로그
로그는 추적 성능 평가에 많은 도움이 됩니다.
다음은 롤과 요 속도 추적의 좋은 예입니다.
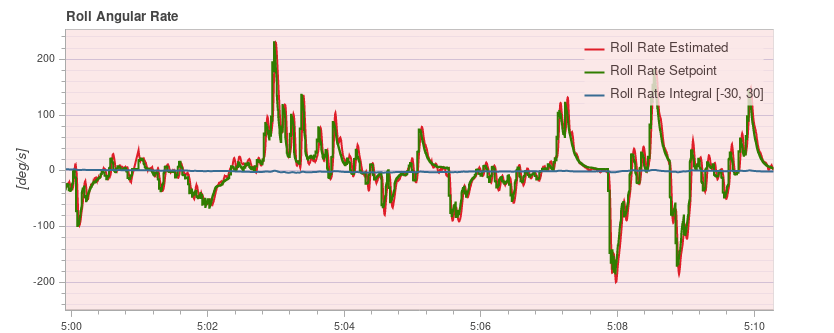

다음은 극단적인 스텝 입력을 생성하는 몇 번의 플립으로 롤 속도를 추적하는 좋은 예입니다.
You can see that the vehicle overshoots only by a very small amount:

### 자세 컨트롤러
이것은 방향과 아래의 튜닝 매개변수를 사용하여 기체의 비율의 출력을 제어합니다.
- Roll control ([MC_ROLL_P](../advanced_config/parameter_reference.md#MC_ROLL_P))
- Pitch control ([MC_PITCH_P](../advanced_config/parameter_reference.md#MC_PITCH_P))
- Yaw control ([MC_YAW_P](../advanced_config/parameter_reference.md#MC_YAW_P))
자세 컨트롤러의 튜닝은 비교적 간단합니다.
대부분 기본값을 변경할 필요가 없습니다.
To tune the attitude controller, fly in _Stabilized mode_ and increase the **P** gains gradually.
진동이나 오버슈트가 나타나는 것은 게인이 너무 높은 것입니다.
아래의 매개변수를 조정할 수 있습니다. 세 축의 최대 회전 속도를 결정합니다.
- Maximum roll rate ([MC_ROLLRATE_MAX](../advanced_config/parameter_reference.md#MC_ROLLRATE_MAX))
- Maximum pitch rate ([MC_PITCHRATE_MAX](../advanced_config/parameter_reference.md#MC_PITCHRATE_MAX))
- Maximum yaw rate ([MC_YAWRATE_MAX](../advanced_config/parameter_reference.md#MC_YAWRATE_MAX))
### 추력 곡선
위의 튜닝은 호버 스로틀 주위의 성능을 최적화합니다.
그러나 풀 스로틀로 갈 때 진동이 시작될 수 있습니다.
To counteract that, adjust the **thrust curve** with the [THR_MDL_FAC](../advanced_config/parameter_reference.md#THR_MDL_FAC) parameter.
:::info
The rate controller might need to be re-tuned if you change this parameter.
:::
The mapping from motor control signals (e.g. PWM) to expected thrust is linear by default — setting `THR_MDL_FAC` to 1 makes it quadratic.
그 사이의 값은 둘의 선형 보간을 사용합니다. 일반적인 값은 0.3 ~ 0.5 입니다.
If you have a [thrust stand](https://www.tytorobotics.com/pages/series-1580-1585) (or can otherwise _measure_ thrust and motor commands simultaneously), you can determine the relationship between the motor control signal and the motor's actual thrust, and fit a function to the data.
The motor command in PX4 called `actuator_output` can be PWM, Dshot, UAVCAN commands for the respective ESCs in use.
[This Notebook][THR_MDL_FAC_Calculation] shows one way for how the thrust model factor `THR_MDL_FAC` may be calculated from previously measured thrust and PWM data.
이 플롯에 표시된 곡선은 α k, 실제 단위 (kgf 및 μs)로 추력과 PWM을 표시합니다.
In order to simplify the curve fit problem, you can normalize the data between 0 and 1 to find `k` without having to estimate α (α = 1, when the data is normalized).
]
:::info
The mapping between PWM and static thrust depends highly on the battery voltage.
:::
An alternative way of performing this experiment is to make a scatter plot of the normalized motor command and thrust values, and iteratively tune the thrust curve by experimenting with the `THR_MDL_FAC` parameter.
해당 그래프의 예는 아래와 같습니다.

원시 모터 명령 및 추력 데이터가 실험의 전체 범위에 걸쳐 수집되는 경우, 다음 방정식을 사용하여 데이터를 정규화할 수 있습니다.
_normalized_value = ( raw_value - min (raw_value) ) / ( max ( raw_value ) - min ( raw_value ) )_
정규화된 값의 산점도를 얻은 후 방정식을 플로팅하여 곡선을 일치시킬 수 있습니다.
_rel_thrust = ( `THR_MDL_FAC` ) _ rel_signal^2 + ( 1 - `THR_MDL_FAC` ) \* rel_signal\*
0과 1 사이의 정규화된 모터 명령 값의 선형 범위.
Note that this is the equation that is used in the firmware to map thrust and motor command, as shown in the [THR_MDL_FAC](../advanced_config/parameter_reference.md#THR_MDL_FAC) parameter reference.
Here, _rel_thrust_ is the normalized thrust value between 0 and 1, and _rel_signal_ is the normalized motor command signal value between 0 and 1.
In this example above, the curve seemed to fit best when `THR_MDL_FAC` was set to 0.7.
[THR_MDL_FAC_Calculation]: https://github.com/PX4/PX4-user_guide/blob/main/assets/config/mc/ThrustCurve.ipynb
스러스트 스탠드에 접근할 수 없는 경우, 경험적으로 모델링 요소를 조정할 수 있습니다.
0.3부터 시작하여 한 번에 0.1 씩 늘립니다.
너무 높으면, 낮은 스로틀 값에서 진동이 감지되기 시작합니다.
너무 낮으면, 더 높은 스로틀 값에서 진동이 나타납니다.
### Airmode & Mixer Saturation
속도 컨트롤러는 세 축 (roll, pitch 및 yaw)에 대한 토크 명령과 스칼라 추력값을 출력하며, 이는 개별 모터 추력 명령으로 변환하여야 합니다.
이 단계를 믹싱이라고 합니다.
예를 들어 낮은 추력과 큰 롤 명령의 경우 모터 명령 중 하나가 음수가 될 수 있습니다 (비슷하게 100 % 이상이 될 수 있음).
이것은 믹서 포화입니다.
기체가 이 명령을 실행하는 것은 물리적으로 불가능합니다 (가역 모터 제외).
PX4에는 이 문제를 해결하기 위한 두 가지 모드가 있습니다.
- 롤에 대한 명령된 토크를 줄여 모터 명령이 0 미만이 되지 않도록합니다 (에어 모드 비활성화 됨).
명령된 추력이 0 인 극단적인 경우에는 더 이상 자세 보정이 가능하지 않으므로이 모드에 항상 최소 추력이 필요합니다.
- 또는 명령된 추력을 증가시켜 모터 명령이 음수값이 되지 않도록 합니다(에어 모드 활성화).
이것은 낮은 스로틀이나 제로 스로틀에서도 자세/속도를 정확하게 추적할 수 있는 큰 장점이 있습니다.
일반적으로 비행 성능을 향상시킵니다.
그러나, 이는 스로틀이 0으로 감소하더라도 기체가 계속 상승하도록 총추력을 증가시킵니다.
잘 조정되고 올바르게 작동하는 기체에는 제외하고, 너무 높은 P 조정 이득으로 인하여 기체가 강하게 진동할 때 발생할 수 있습니다.
두 모드는 두 모터에 대한 2D 그림과 롤 r에 대한 토크 명령은 아래에 표시되어 있습니다.
왼쪽 모터에서는 r이 명령된 추력에 추가되고, 오른쪽 모터에서는 차감됩니다.
모터 추력은 녹색입니다.
Airmode를 활성화하면 명령된 추력이 b 만큼 증가합니다.
비활성화되면, r이 감소합니다.

혼합이 상한선으로 포화되면, 명령된 추력이 감소되어 모터가 100 % 이상의 추력을 전달하지 않도록 합니다.
이 동작은 Airmode 로직과 유사하며 Airmode 활성화 여부에 관계없이 적용됩니다.
Once your vehicle flies well you can enable Airmode via the [MC_AIRMODE](../advanced_config/parameter_reference.md#MC_AIRMODE) parameter.